Want to record your drums at home? Know little to nothing about recording but you’ve decided to not let it intimidate you anymore? This beginner’s guide will cover a few of the basic things you’ll need to get started, like how to set up your space and choose the right gear, mics, hardware, and software.
We’ll also go over how to work within a session, play the right way, and edit your recordings so you can crank out killer drum tracks.
The first step to making awesome home recordings is a great-sounding room. Here are a couple of things to think about when you set up:
Studio location: Not sure where to start? Living rooms, bedrooms, garages, and basements can all work great if you set them up the right way. Every room sounds different, and the best way to get a good sound is to experiment. Choose a quiet, cozy space where you’ll be comfortable spending lots of time. Make sure it isn’t too hot or cold, has good lighting, and is clean and dry (no one wants their drums floating away if the basement floods!).
Big rooms vs. small rooms: If you’re in a huge, open space, your drums will probably have a lot of echo (called reverb). In a smaller room, the sound will be more dead since it has less space to bounce around. If you have a choice, pick a medium-sized room and try setting up in different locations to see what sounds best.
 1")
Isolate: Try to stay away from appliances like heaters, washer/dryers, A/Cs, or fridges. It’s sometimes hard to get total quiet at home (kids, dogs, neighbors), but less noise around you means less sound bleeding into your mics.
Arrange the furniture: Big sofa in the corner? All good! Large furniture is perfect for absorbing a wide range of sound frequencies and making your room less boomy (aka broadband absorption). On the other hand, if it sounds like you’re in a tiny phone booth, take stuff out of the room or move it away from the kit to liven things up.
Get a rug: It will keep your drums from sliding and reduce the ringing even more. A standard drum rug is about 5 x 6 feet, and will fit a 5-piece drum set (if your setup looks like Neil Peart’s, you might need a bigger one). Ludwig makes a nice one for about $100 (or buy it in Europe), but you can also go to your local hardware store and pick up an area rug with a woven bottom or pad.
Use sound treatment: Putting panels and foam on the walls and ceiling will improve the sound even more by cutting down on high frequencies. For a professional option, you can get these foam acoustic panels for $59.99 (shop panels in Europe). You can also use egg crates, mattress pads, sheets, blankets, or that trippy tapestry from your college dorm, and hang them at the height of the drums. On the other hand, if the room is too dead, put wood panels on the wall to reflect the sound and add life to it. These professional diffuser panels are pretty cool, but plain ‘ol plywood works great too, especially if it’s bent and has an irregular shape.
 2")
Set up a workstation that includes:
 3")
Build yourself a little nest and try to keep it tidy back there. You’re going to be running lots of cables from the mics to your recording setup and you’ll be more comfortable playing if everything is in place.
Now that you’ve picked your spot, it’s time to get the drums set up!
Gear selection: It’s important to choose the right drums for the style of music you’re recording. Here are a few tips:
Put everything in place: It’s important to be relaxed and comfortable so you can give your best performance. Sit at a comfortable height so the top of the snare is just above your belt, and make sure you can reach everything easily.
 4")
(Check out this video for more tips on setting up and sitting the right way.)
Also, make sure your rack toms and cymbals are angled properly and not rubbing or rattling against other parts of the kit – all of that will get picked up in your mics.
 5")
Change those drumheads and tune up: You can have awesome, brand new drums, but they won’t sound quite right on a recording if the heads are shot. Pick up a new drumhead pack from Remo (in Europe) for less than $100 and tune ‘em up! Here are a few tips specifically for recording:
We’re just scratching the surface here, and you can get more tuning info at this link.
Maintain and clean your gear: Drums are like old friends that will always be there for you. Treat them with love and care, and they’ll sound great when it’s time to record. Make sure all your hardware works. This means no rattling, missing or stripped screws, broken floor tom legs (the worst!), wobbly drum thrones, bad snare throw-offs, or squeaky pedals (try a WD-40 lubricant or Vaseline). Also, make sure the bass drum and hi-hat stand have working leg spurs to avoid sliding.
Dampen those extra overtones: Ever notice how sometimes when you hit the smallest tom, it makes the snare rattle like crazy? That’s not a sound you want on your recording, so here are some techniques you can use to kill those nasty frequencies:
 6")
For more on this topic, check out https://www.drumeo.com/beat/pro-drum-studio-tips/.
Above all else, remember that the gear will only take you so far. The most important part of an awesome recording is a great drummer!
Now that your drums are set up and tuned, it’s time to pick some mics. There are so many different brands, styles and price options to choose from, but don’t worry – we’ve got you covered. Here’s a rundown:
The number of mics you can use depends on how many input channels you have on your audio interface (we’ll talk more about that in the next section). It’s great to be able to put a separate mic on each part of the kit since that will give you the most control over the sound. But you absolutely do not need a mic on every drum to make a great recording. The Beatles’ classic album A Hard Day’s Night was made using just two drum mics – one on the bass drum and one suspended over the rest of the kit. You also do not need to spend thousands of dollars on mics to get a happening drum sound (good news!).
The 3 main types of microphones for recording drums
Dynamic: Best for bass drums, snares, and toms. They isolate more sound so other things don’t bleed in. They are usually the least expensive and most durable type of mic.
Condenser: Best used as overhead mics placed above the kit to capture the cymbals and overall sound. They pick up a wide range of frequencies and are more sensitive than dynamic mics.
Ribbon: Best used as general “room” mics or for the overheads. They can be the most expensive type and are highly sensitive to sound and fragile (don’t drop these!). They process sound the most like the human ear.
*Note: Some of these mics require something called “phantom power” (condensers), and some could actually be damaged by it (ribbon mics), so read the specs carefully before you plug in. Phantom power can be turned on/off using the “48V” switch on your audio interface.
Mic recommendations and uses for each part of the kit
*All prices in this guide are in USD and reflect retail prices for new products unless stated otherwise. These prices were last updated in 2020.
These will get you going with enough mics for a 5-piece drum set without breaking the bank.
The packs are a good place to start, but you can usually get better quality options if you buy individually for each part of the drum set.
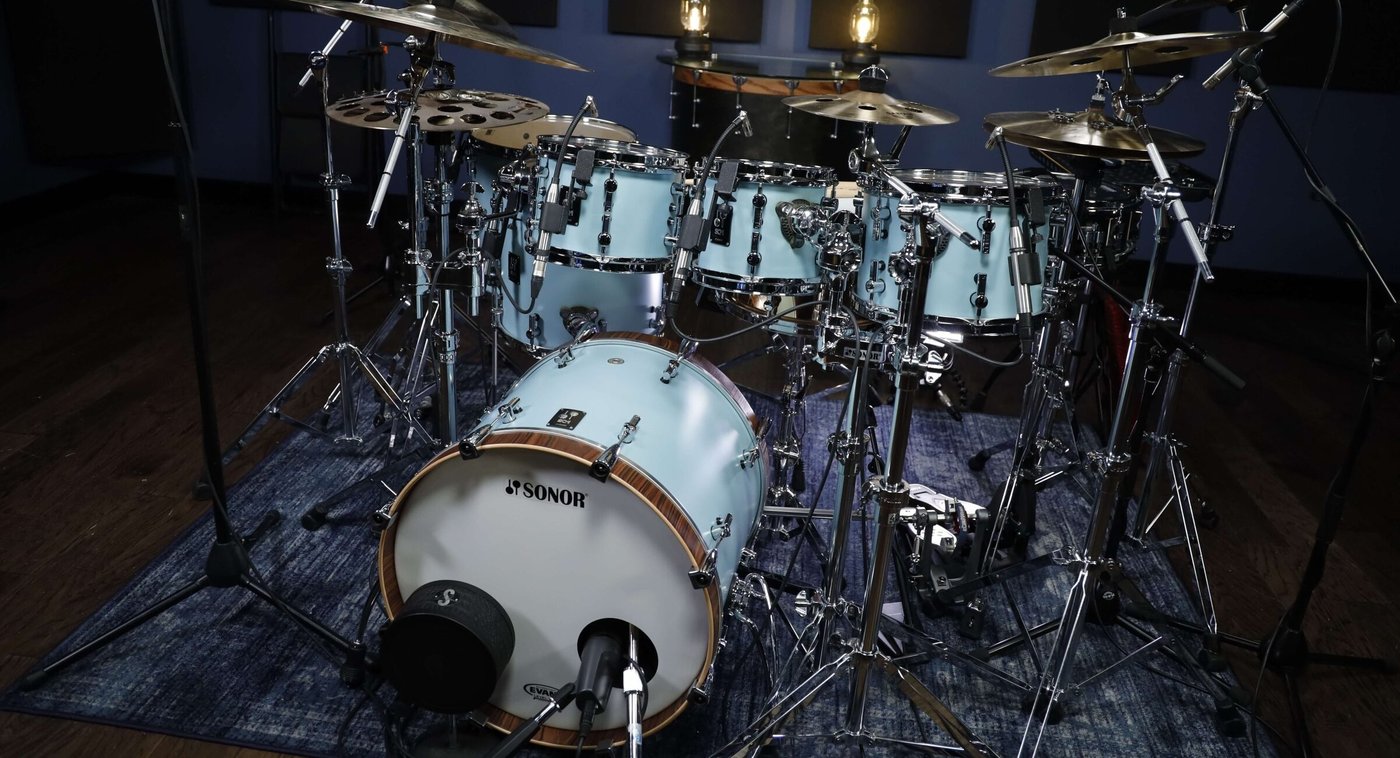
The bass drum has a low frequency, so you’ll want to use a dynamic cardioid mic that can handle those big “booms”:
Placement
This is very important in determining the sound you’ll get. To start, place the mic on a short stand near the hole in your kick drum head (if you don’t have one, just put it about 2 inches away). The closer you get to the front head, the more attack or “punch” you’ll hear in the sound. Try out some different positions and see what sounds the best – your ears will lead the way.
You can also try resting the mic on the pillow inside the drum, although that sometimes can be too loud and cause a distorted sound called “clipping”.
 7")
While there are plenty of options to choose from, the Shure SM57 (buy in Europe) has long been one of the most durable, affordable, and quality snare mics available. The “57” is the Swiss Army knife of drum recording. It costs $100, lasts forever, sounds great, and is easy to use. A great choice!
Other options:
Placement
Putting the mic closer to the drumhead will give you more punch (smack), while moving it further away should create a fatter tone (thump). Even the smallest adjustment will really change how it sounds on your recording, so experiment and find the sweet spot.
You’ll need a mic stand (feed it between your crash cymbal and hi-hat stand), or try a clip-on. Some advanced engineers put a second mic on the bottom of the snare and blend the sounds together, but if you’re just starting out, one mic is perfect. Make sure to point it towards the top head and experiment to get that killer tone.
 8")
Tom mics often come in packs of 3 which is great for affordability. Just like the bass drum and snare drum, it’s best to use dynamic mics which will help you isolate the sound. Condenser mics can work too in some cases.
Placement
Point the mic directly at the drumhead for the best sound. Make sure it’s not in your way when you play – you don’t want to smack it by mistake! Just like with the snare, adjust the height and positioning to change the sound. If it sounds muddy and unclear, get closer; if it’s too thin and papery, move back.
 9")
Place two mics on tall stands pointing down over the kit to capture a wide snapshot of everything. You don’t need to mic each individual cymbal – you’ll hear plenty of them in your overheads. Overheads usually come in pairs (left and right). Small diaphragm condenser mics are a good choice since they pick up more surrounding sound than dynamics and can handle high frequencies like your cymbals. Ribbon mics will work too, and they usually have a darker tone (good if your cymbals are really bright).
Here are some options:
 10")
Placement
Put one overhead mic above your hi-hat/left crash cymbal and point the diaphragm (the part you would speak into) towards the snare. Do the same with the other overhead on the ride cymbal side. Grab a tape measure and adjust the distance of each mic so each tip is the exact same distance from the center of the snare. Start with 42 inches and move up/down/forward/back if your signal is loud or quiet. Make sure you’re not picking up way too much of one side of the kit or the other. It’s cool if one mic is higher or lower, as long as the distance to the center of the snare is equal for both.
This will prevent something called “phasing” where the sound travels further to one mic than the other, which can muddy up your recording.
 11")
Some people put a separate mic on the hi-hat, while others prefer to use the overheads and room mic to capture that sound. If you have enough inputs and want to try a hi-hat mic, use a Shure SM57 or any other dynamic, directional mic (as we said before, it’s the Swiss Army knife of drum mics! We love the “57”).
Placement
Point the mic downwards towards your top hi-hat, about 2-3 inches away, and adjust the height if the signal is too loud or quiet.
Room mics
It’s the secret weapon to a great drum recording! Setting up a mic on the opposite side of the room away from the kit is a great way to make the sound full and rich. Large diaphragm condenser mics and ribbon mics work great since they are very sensitive.
Options include:
You’ll need a good pair to hear the music and/or click track you’re playing along with. There are two main types of headphones: open (less isolated sound) and closed (total isolation). Most drummers prefer the closed type, but it’s a personal choice and it’s good to try them out before you buy.
*Note: Avoid iPhone earbuds. They won’t isolate the sound or have any low-frequency response – you gotta hear that bass player!).
Here are some headphone options that are perfect for drummers:
These are very under-appreciated and important. Here are a couple of things you’ll need:
One bad cable can cause a mic to sound distorted, and one loose screw can make a mic stand fall and spoil a great performance. Make sure everything works and is in good condition.
 12")
How many mics you use – and where you place them – depends on the style of music you’re recording and how many inputs you have on your audio interface.
If you have 1 input, put the mic overhead to capture as much of the kit as possible (not too close; try a height of about 42 inches from the center of the snare).
If you have 2 inputs, you can mic:
If you have 4 inputs, mic the bass drum and snare and use 2 overheads.
If you have 6 inputs, you can mic:
If you have 8 inputs: bass drum, snare, 2 overheads, 3 toms, 1 room mic.
If you have more than 8 inputs: bass drum, snare, hi-hat, 2 overheads, 3 or more toms, 1 room mic.
Think of your interface as the translator that interprets the sound from the mics so your computer software can understand and record it. It’s like the giant brain of the whole operation. Most connect to your computer via USB or Firewire, and it’s important to choose one that has enough XLR inputs for each mic. Every interface has its own unique sound, and here are some options:
One other thing to consider is that cheaper, lower-quality interfaces sometimes don’t perform as well. They can create a lag called “latency”, or make unwanted humming or hissing sounds. Better gear is less likely to do that, so take that into consideration when you buy.
 13")
A preamplifier boosts the level of the signal that comes through your mics. You might think, why do I need this? I can just turn it up myself if it’s too quiet! Good preamps make everything sound clearer and less distorted. It’s like a quick power-wash and diesel fuel-up before the sound gets to your software.
Most interfaces have them built-in, and they all sound a little different. Those are good to start out, but if you get excited and want to upgrade, you can spring for an external preamp to use along with your audio interface.
Here are a couple of options that are good for drums (Note: we’re just scratching the surface – engineers will nerd out on this topic all day if you let them):
This is the computer program you’ll use to record and manipulate the sound. There are so many choices! Some are perfect for beginners, while others have more features. We won’t go over all of them, but here are a few popular ones at different prices to get you going:
GarageBand
 14")
Pros:
Cons:
Pro Tools
 15")
Pros:
Cons:
Reaper
 16")
Pros:
Cons:
Others
How to choose a DAW
If you’re just starting out, try working with one of the free programs like GarageBand or Audacity. As you get more comfortable with recording, you can upgrade to Pro Tools, Reaper or Logic Pro for more features. Most have a free trial option so you can check them out before you buy.
We’ve reached the fun part! It’s time to connect your drum mics to the interface, create a new session file, and start recording. This computer stuff can seem intimidating at first, but once you figure it out, you’ll be good to go.
Each DAW has slight differences, but here are some basic steps.
(Note: Images are from Pro Tools):
 17")
 18")
 19")
 20")
 21")
 22")
The most important thing to remember when you record is to play a steady groove, keep great time, and enjoy the process. Here are some tips:
Recording at home means you’ll be wearing two hats: drummer and engineer. You don’t have to learn every detail right away to make a successful recording, but knowing your way around your DAW will make things a lot easier.
Organize and label your tracks: Otherwise, it’s easy to get confused about what is what.
Use hotkeys and shortcuts to make things way faster (each DAW has different ones; for example, you can use Command-S (Ctrl+S on a PC) in Pro Tools to save, and Command-Z (Ctrl+Z) to undo).
Save everything frequently: Sometimes, bad things happen to good people; aka, sometimes the computer crashes. Also, make sure all other programs are closed since your DAW takes up a lot of processing power.
Keep checking your mic levels: This is especially important for us drummers. Let’s say you record one super-loud tune and the next one is quieter. You might have to adjust the positioning of a mic or nudge some volume knobs to keep from clipping, or you might have to boost the signal.
Use the playlist function (if your DAW has it) to keep your session tidy and organized. Playlisting is great when you record multiple takes of the same song, and want to keep more than one version and decide what to use later. For example, maybe you liked take two the best overall, but want to paste in a fill from the end of the first chorus of take one. Playlists allow you to neatly meld different takes together without making a mess of your session by creating a million new tracks and moving everything around manually. (Note: this only works if you use a click track and everything is aligned to the grid)
Creating groups is an easy way to edit multiple tracks at once. For example, if the overhead mics are too loud, you can tweak the level of both the Left and Right together if they are in a group. It’s also helpful to have one group that includes the whole kit in case you want to make an edit.
 23")
 24")
Check your disk allocation to see where your tracks are being saved. It’s a good idea to use an external hard drive that’s just for recording – a full hard drive often means a slower computer.
 25")
 26")
Adjust your buffer size: This is literally the tiny amount of time it takes for the audio to be captured. Sometimes you can experience a lag or “latency” when you record, and increasing your buffer size can make that go away. You’ll probably want to lower it again when you’re editing later since a higher buffer size can strain your computer’s processing power. In most DAWs it’ll be listed under “Playback Engine”.
 27")
 28")
Don’t forget to record-enable each track. It would be a bummer if you played a killer take and then realized it didn’t actually record (ooof!).
Save frequently (can’t stress this enough).
Let’s say you just recorded a great track, but made one mistake at the end that’s driving you nuts. Maybe it’s a fill you wish you didn’t do, or a few bars where you got off the click track. You’re screwed…or maybe not! Learning some basic editing skills in your DAW can help you fix these things so you don’t have to record a whole new take.
 29")
 30")
 31")
 32")
These basic editing functions are just scratching the surface of what your DAW can do. There are a ton of mixing tools you can use to make your tracks even better like adding EQ, compression, and other effects. But knowing how to do basic edits along the way is really helpful.
You’re done! You made a killer drum track and you’re ready to share it with your bandmates, friends, and of course, The Internet. Here are some tips for finishing off the recording process and exporting your files.
 33")
 34")
 35")
 36")
Stereo interleaved is usually the best choice since it puts all your data into one single file, which is easier to work with.
 37")
And that’s it! I hope this intro to home drum recording helps you get started.
*This article contains affiliate links, which means we might earn a small commission from the product seller if you make a purchase. For more info, check out our privacy page.
Rob Mitzner is a New York-based session drummer who has recorded for Billboard Top-10 charting albums, films and Broadway shows, performing live at Lincoln Center, The Smithsonian, Caesar’s Palace, The Blue Note, Boston Symphony Hall and for President Obama in his hometown of Washington D.C. He is currently working on a drum book with Hudson Music and has also been featured in Downbeat Magazine and Modern Drummer, and on the national TV show “Trending Today” on Vice. Rob holds a B.A. in Music and Political Science from Brown University, and is a proud endorser of Paiste Cymbals, Remo drum heads, Hendrix Drums, and Drumdots.

By signing up you’ll also receive our ongoing free lessons and special offers. Don’t worry, we value your privacy and you can unsubscribe at any time.