New to samples and sample replacement? Wondering how to get started? If so, you’ve come to the right place!
(If you’re new to recording drums in general, you should start with the beginner’s guide here.)
If you don’t want to record your own, click here for a zip folder full of drum samples you can download and use!
I was going to start this article with a small anecdote about whether or not using samples is ‘cheating’, but Aaron Edgar beat me to it: Are Triggers Cheating?
While that article focuses on the many ways a trigger can be used to expand your drumming and creativity, I felt remiss not to mention it here. After all, it mentions three important uses of samples that we will focus on in this article:
In this guide, you’ll learn what samples are, what they’re used for, their pros and cons, and how to record and edit your own. My goal is to give you, as a drummer, enough tips and tricks so that you can deliver a fantastic performance in the studio the next time the engineer asks you to take samples of your kit.
And if you are one of those people who dabbles in mixing your own productions and recordings, we’ll look at a few techniques on how to apply samples to your mixes, and eventually how to get creative with samples and special effects.
If you’re new to samples and relatively new to recording, there’s a handy glossary at the end of this guide in case you aren’t familiar with some of the terms.
This is going to be a long article with tons of information, so strap in! I will also be using a few bits of software during this article and video demos such as Pro Tools, Slate Trigger 2, NI Battery, NI Kontakt, and some third-party plugins that will help me illustrate what’s going on in the mix.
If you want to follow along, you’ll need:

I’ll try and approach everything in a simple, generic way, so you can apply the same principles to your DAW and sampler plugin of choice.
All set up? Let’s get started!

A sample is a short piece of audio – in our case, a drum hit – that is cropped to start at the zero-crossing point behind the transient (check out the glossary at the end of this article if these terms are new to you). Usually, that sample is taken from the close mic that belongs to that drum, or a combination of microphones around the drum kit for a more realistic sound.
Let’s get a few things out of the way:
It would be wrong to say there isn’t a place for drum samples in any well-engineered recording performed by amazing drummers.
Want a classic example? Jeff Porcaro and Bernard Purdie played on Steely Dan’s “Gaucho”, engineered by the legendary Roger Nichols. During the recording sessions, Nichols started the development of the Wendel, the first drum sample replacement machine.
That album won Nichols – well, the Wendel – a platinum Grammy.

Since then, countless hit records by top artists all over the world have used sample replacement, augmentation, or reinforcement in some way or another. Andy Wallace is notorious for using sound samples; Nirvana’s Nevermind trick of sending drum samples to reverbs has become legendary. Andy Sneap has been on record saying that using drum samples is the only way to go in heavier rock and metal genres. Chris Lord-Alge has, in multiple interviews, shared some of his favorite samples (some samples were even provided by his friend Steven Slate). Even in the country scene, prolific mixing engineer Billy Decker is using extensive sample replacement and augmentation on his mixes.
With such a roster of engineers with extensive discographies, I’m sure you’ve enjoyed more than a few tracks that have drum replacement/augmentation or enhancement.
Before the Wendel, there are stories of engineers completely surrounded in tape for days making loops that cover the whole song. If you needed longer tape loops, you’d have to take the tape out of the reel and use microphone stands or use the pulleys between one or more tape machines to achieve the desired loop length.
I’ve also heard stories of engineers punching in snare drums or kick drums one by one on tape. Can you imagine how tedious and long of a process that is? Remember, you couldn’t just jump to the next snare hit like you can now. You’d have to press a combination of keys to make the tape safe for scrubbing and manually rotate the flanges so you could find the exact point the snare or the kick hits. Mark the tape with your chalk, and then prepare to punch in – which could easily take a few goes to get right.
This is not to say there wasn’t sampling before the Wendel. By the ’40s, there was the Musique Concrete movement that was doing a lot in terms of sampling, synthesizing, and even digital signal processing. But what Roger Nichols did for Steely Dan’s “Sweet 19” track was groundbreaking.
The Wendel was indeed revolutionary, but it was not a fast process. You’d have to feed it the click track (the only means of synchronization back then) and then feed it the instruments you wanted to trigger – one at a time! Once that was done, you’d have to use a very non-friendly user interface to tweak some of the parameters that the Wendel would allow you to trigger.
Other options for sampling (the Fairlight comes to mind) were becoming popular and easier to program. There were also several incarnations of the Wendel that were more accessible to users.
It didn’t take long until effects processors such as the AMS DMX (famous delay processor) or the Roland SDE (famous delay unit) and later on the Lexicon 480L (probably the most recognizable reverb processor in a studio environment) allowed you to load a sample into the memory and trigger it via an audio input. All you had to do was make a copy of the snare or kick and feed it to the unit. You would then record that back to tape, so you could free up the AMS DMX or Lexicon 480L for other reverb duties.
The issue with doing the above was the delay. The sample could come in as much as 20ms late, creating phasing issues or even flamming.
This was fixed by extending the setup process to trigger drums by:
Not long after that, drum machine brains were also used. They had TRS (jack) inputs (for the trigger pads) and engineers found out they could aggressively process the drums and feed them into those brains to trigger the drum machines for enhancement or augmentation (and even replacement sometimes).
Today, samples are as much of a technical tool as a creative tool. They allow you to get creative with the mixing process, fix problems with the recording, and get around budget constraints when planning recording sessions. But as with everything, if abused or used incorrectly, samples can lead to issues in your mix or make your song sound just like many other songs out there.
As this is a pretty long article, here are some points of interest:

Chrissy Lopez laying down a drum track.
In some cases, samples give some genres of music their sound. Try to approach this next section with an open mind about what genres are traditionally heavy adopters of samples, and what genres might not be the best application for them – replacement or otherwise.
Here are some situations where using samples can literally make or break a record:
But you performed for the entire album using your hands on your desk, and your feet on the floor. You had a microphone for each hand and your feet and you are using those short transient sounds to trigger drum samples. You literally skipped having to get a drum kit and a room that sounds good and skipped having to rig up a complex setup to get your performance recorded.
Oh, and drum heads are really expensive. Maybe you are using a box room to play in, or a concrete/brick wall garage with horrible acoustics. There’s no budget to rent a studio for two or three days, let alone rent an extra drum kit and hire a drum tech. The use of samples might allow you to get a track recorded and sounding commercially viable.
You know how to get a great sound out of the drums, but this one song on your record would make more sense to have a down-tuned Black Beauty snare, or a 26″ kick drum instead of your 18″ bop kick. There’s nothing wrong with your playing, but the right “vibe” is not coming out. You have the wrong tools for the job. It’s okay! Being able to replace portions of the kit with samples of drums that fit the song better can change the vibe of a track completely. At this point, we want whatever serves the song best.
This is made worse by the fact that the song is so busy or the arrangement is so dense that a few snare hits get buried and the energy is lost. Just augmenting or reinforcing the snare means we have a consistent backbeat throughout the song – making it more danceable and helping it carry more energy to the listener.
This means the microphones on the toms and snare are picking up too much from the hi-hat or crashes. The engineer did the due diligence and asked the drummer to raise the cymbals – but they weren’t able to perform some of the parts very well. This is common, and it’s fine. If I were the engineer, I’d have a decision to make at this point:
If you picked the second option, the drummer played more in time and cleaner because the kit was how they liked it. If the mixing engineer isn’t able to compress or brighten the snare as much as they’d like without making cymbals too loud or harsh, they can slide in a snare or tom sample that complements the sound they’re after – and EQ and compress that sample instead!
Using samples in any capacity has become the staple sound of nearly all modern, commercial (eg. “radio-ready”) songs in pop, rock, and metal. There are even indie tracks, ballads, and folk songs that reap the benefits of drum samples. Even stuff coming out of Nashville – one of the country and folk capitals of the world – has drum samples front and center.
As with everything, there are some downsides to using samples as well:
With all of this in mind, I’ve started asking my mixing clients if they want their songs “radio-ready” or if they have an artistic vision for their track. Why? Because that can definitely influence the path I go down when mixing. Artists who have a really clear vision and are not bothered about commercial success tend to prefer natural performances – warts and all. These artists love to overthink every detail and make sure things are as loose or as tight as they want. They are not trying to compete with other releases, but rather match the vision they have in their heads.
On the other hand, people who are trying to make commercially viable tracks usually want a loud and upfront mix that’s polished and precise. It’s hard to get a mix that can compete with other releases (who use samples in some capacities) if you don’t use samples yourself.
When everything is so loud and massive, something has to give. The backbeat can become weak, or some of the weaker strokes will be drowned out. The listener might experience that temporary loss of snare or kick (or tom) as a loss of energy and hype. These sorts of mistakes will become more apparent the more polished the mix is.

If you aren’t an engineer, you can skip this section.
Samples may feel like cheating to you. It may feel like you are raising your hand to admit defeat – that you somehow messed up the tracking session. “You need to get good sounds at the source,” they say.
Yes, it’s true. There isn’t a “fix it in the mix“.
We should get the best sound we can at the source.
But sometimes it just isn’t possible. Maybe because of budget restrictions. Maybe because the room wasn’t right or the tuning was off. Or the aircon in the car broke down and it was 100 degrees outside and the heads warped and no matter how much you tune them they aren’t settling.
What I’m trying to say is: not everything is within our control. We need to be kind to ourselves and accept that that’s the best sound we’ll get – and for the sake of your session, move on. Why not use samples to improve it later?
One thing I’ve learned the hard way was that being a studio engineer is one of the most misleading job descriptions in the world. It’s so much more than that. You are often the keeper of the session – where managing time and the mood/morale is as essential as getting good sounds.
Don’t chase the perfect sound at the expense of time and morale!
Spending hours or days trying to get a perfect sound will be a downer for your clients who are seeing their expensive studio time being wasted on details they can’t really pick up on or understand. Worse – if at the end of the session they can’t track all the guitars or vocals because you spent three days dialing in a drum sound – they will rightfully blame you!
On the morale front, a drummer who spent three hours giving you single strokes on the snare for a sound check will probably not give you the best performance either.
I spent years refusing to use samples.
As a recording engineer, I’d mumbled curses at the drummer for not knowing how to keep their drums in good shape, well-tuned, and for not knowing how to hit them right.
As a mixing engineer, I’d spend three, four, five, even six hours just mixing the drums, obsessing about every imperfection, and trying to squeeze everything I could out of them. But I would refuse to reach out for a sample.
And you know what? It wasn’t worth it.
Not in my opinion, anyway.
I could have slapped a good sample in, automated or programmed it to better suit the song, and moved on to the rest of the tune in a fraction of the time. Cheating? No! Making the song sound its possible best? Yes!
I have two more points to make as to why samples are worth embracing:
Have you ever received a set of multi-tracks, recorded in small rooms with a lot of reflections (eg. every concrete garage out there)? There’s so much spill between microphones, and there’s only so much processing you can do, realistically, before every microphone becomes a glorified hi-hat mic.
Yet, the producer writes to you in the brief:
“Make it sound like any of the happy, upbeat, feel-good, Michael Bublé pop tracks.”
Here are your options:
Lastly, have you ever got to a point where you feel your mix is spot on, but the song just fails to move? As in, it sounds static, there are no changes that make that chorus lift up or hit harder, or there’s nothing that makes the verse feel cozier.
Maybe you even tried to automate reverb, reverb tails, and delays. And the client asked you to turn the reverb down. And now you’ve run out of ideas.
Listen to this amazing track from Regina Spektor’s ‘What We Saw From The Cheap Seats’ album (engineered by Adam Hawkins), and look at what happens to the drums in the pre-chorus at the 40-second mark.
Did you see how changing the snare sample between the song sections gave the song more momentum? Listen to how it goes from a small, tight-sounding snare and opens up into a big, loose, dropped-down, and fat snare tone.
My point is: get creative with samples!
Slide in sound effects, save time layering that tambourine or get that metal breakdown sounding as heavy as you can. Or change snares between verse and chorus.
For some microphone techniques, tips, or tricks, click here.
For mixing techniques using samples, go here.

Look, I know. We’ve spent too much money on those amazing beautiful snare drums, and more money and time trying out the perfect combination of heads and snare wires. These recording folks just don’t understand. We spend hundreds of hours with this snare sound – curating it, cultivating it. It’s part of who we are, right?
Don’t take it personally when an engineer or a producer decides to use samples. They are often looking for an aesthetic – a unified artistic direction. Maybe they are trying to make sure your band and your song will please the target audience and are doing their damndest to make sure that your song and recording can compete with or beat other artists in the same market as you.
It’s not that they don’t like the snare sound you have. They probably do. They probably love how amazingly consistent you are, but perhaps the gear you brought is not the right tool for the job. You came in with a nice bright snare full of overtones when the song really needs a low down, throaty and rumbly sound to give the song the gravitas and force it needs.
Looking quickly at the music industry today, everyone is fighting for a radio slot or a place in *that* Spotify or YouTube playlist that will propel your song to fame. You need to fit in a certain aesthetic, mix style, and level of perfection to make your way into those playlists. Even if you and your bandmates don’t care about status and are making music under an artistic lens – away from the pressures of performing and delivering a perfect “radio-ready” track – usually acoustic recordings alone won’t bring you close to the sound that you have in your head.
With the liberalization of music production and recording, more artists have been using samplers and virtual instruments to write music. Certain samples, drum machines, and synthesizer pieces are so common that their sonics have influenced the vision for artists and entire genres. This is not a new trend. We are still reaching out to 808 drum sounds, 303 Bass Acid lines, or Juno Pads since they were introduced in the ’80s. Some music is still defined by the gear used.
What does this mean for us drummers? It means the only way to attain our goal sound that serves the expectation for the music is to accept our snare or kick might be replaced, augmented, or reinforced to achieve the desired sound.
We’ve been debating for decades whether to let the engineer quantize to the grid or not, and this is just another layer of artistic decision that transcends our performance on the kit.
So fear not: you shall not be replaced by the dreaded drum sample, triggering-replacer machine thingy. Even if they are powered by neural networks and machine learning, and dilithium crystals. People don’t hate your beloved snare sound. They are usually thinking about the song from a production perspective, listening at a high-level view, and not under a drum-focused, microscopic view.
Drum samples don’t have just one unique purpose. They’re used in a variety of situations, from rescuing a bad performance or recording, to polishing a track and bringing it to a commercial release level where it will sound just as loud, solid, and “perfect” as other radio-ready tracks.
But there’s also the creative freedom that samples give you. I had a client layering old Casio keyboard drum sounds on top of the acoustic drum sounds and it gave the song a completely different feel and mood. It complements the lyrics really well and I don’t think the song would have had such an emotional impact in any other way.
For years, I didn’t have a drum kit. Having access to samplers and sample replacements gave me the opportunity to create and keep my brain going in the drumming world – even though I didn’t even have a drumstick near me.
These days, as a remote session drummer, I have samples of my own drums. That way, if the client requests samples of my kit, I only have to add it to the zip file alongside the rest of the multi-tracks. That can save you time and headaches.
If you’re a remote session drummer, having samples of your own drums is a huge benefit for your clients.
I also have a few spreadsheets with different TuneBot settings and a few kits saved in my iDrumTunePro app so I can quickly recall my drum kit as close as possible to those samples. This allows me to do quick revisions on the recordings, or match a sound that the producer wants from my drums.
You could have your own samples available online to showcase the drums you have! That way, the client can request a specific snare or tom.
If you are not really interested in the technical part of capturing drums and drum samples, you might want to skip the next section and see how to perform when recording drum samples.
You should familiarize yourself with some of the basic concepts of how samples can be stored/used/supplied before you do this for the first time:
A one-shot drum sample is a single audio file that contains a single hit of the drum.
These are usually carefully processed hits (snare, kick, or tom hits, and sometimes even cymbal hits) that sound as if they were hand-picked or selected from a final mix – because in many cases they are!
A common way to create these is when the producer or mix engineer picks their favorite sounding hit of a drum from a track. Let’s use a snare drum as an example. The producer will then choose from a selection of the microphones available in a recording (usually one or more snare top microphones, a snare bottom microphone, overheads, and room microphones) and processes them just like in the final mix of the song: each microphone is balanced against each other, with equalization and compression applied to them, perhaps even saturation and reverb. Alternatively, when the mix is ready, a number of microphones and reverb processing are soloed and that drum hit is bounced down to a stereo or mono file.
It’s also not uncommon for a producer to layer the sample with other snare samples, EDM elements, or even special effects.
There are some famous one-shot samples out there. Steven Slate made a career out of his famous one-shot sample CDs that are still widely used to this date. Even though one-shot drum samples fell out of fashion for a while (because they only have one velocity), they’ve made a huge comeback in recent years.
These days, you can find dozens of free and paid online libraries containing one-shots created or used by renowned producers and engineers, as well as creative-sounding one-shot libraries.
The downside of one-shot drum samples is that they become repetitive to the ear very quickly, so they are usually employed as a reinforcement and augmentation technique instead of replacement. There are some tricks to combat one-shot repetitiveness that I’ll cover briefly later in this article.
These libraries – collections of audio files organized by instrument and velocity – include a few different files for each instrument, each corresponding to different velocity layers. That means that for each drum you’ll have a collection of files (or samples) for:
Naming and folder structure is crucial to navigating these libraries. Often the samples can be divided into folders by instrument source and velocity range, or just a well-organized set of folders and files usually labeled like “SnTp_D1_120-127.wav“. I’ll be covering a bit more about naming conventions in a later chapter.

In the above example, the folks at JST decided to add the signal source info to each of the audio files. There isn’t one absolute naming convention, but these are a few things the user will need to know: where is the sample taken from, what is the velocity of the sample, and what note should the sample be assigned to (for multi-instrument libraries, like an entire drum kit).
In the same example, the “Truth Custom Black and Gold [info].txt” README file contains the rest of the necessary technical info, such as the velocity ranges for each of the “crk“, “hrd“, “med“, “sft” labels, and what MIDI notes the sample should be mapped to.
These libraries then need to be loaded into a sampler of choice – such as Trigger, Battery, or Kontakt – and manually “mapped” to MIDI Keys and MIDI Velocities. Some libraries come with pre-made presets for a few famous samplers. The Truth Custom Drum Sample Library above comes with Kontakt and Trigger instrument presets.
These are files that contain the instrument information, such as trigger loading, round-robin, or processing (ie. how the files will be played as well as the necessary samples).
Self-contained patches and sample containers can come in a variety of formats: Native Instrument Kontakt files (*.nkc, *.nkm, *.nki), Native Instrument Battery kits (*.nbkt), and Trigger Instrument (*.tci), among others.
Sometimes, the preset files and the actual samples come separate from each other. The audio files can be a number of wave files (*.wav) like the JST example above, or proprietary files that encapsulate the required audio files, like the Native Instruments Compressed Wave (*.ncw), (*.nkx). Slate Drums uses *.ssd files to accompany their *.ssd5kit instruments. Drumforge uses *.df1 files, and so on.
These sample files or container files are meant to be used by the presets shipped with the samplers or expansion libraries.
Moving them to other folders is a bad idea! A *.nki file expects the *.nkc samples to be in a particular folder to be able to operate.

To put it simply, you find a source you want to sample (your snare, kick or toms, for example) and set up the best microphone(s) for the sound you have in mind. Then, you play a note or a set of notes you want to sample.
There’s more than one way to play an instrument. As an example, to cover all the different “articulations” on a snare, you’d have to record samples of yourself playing a rimshot, a ghost note, and a clean full stroke.
The reason I’m oversimplifying here is that there’s a bit of marketing hype these days. Brands talk a lot about extensive sampling, multiple articulations, and monikers like “deep-sampled” and even “hyper-sampled”. Truth is, it doesn’t take much to start recording your own collection of well-recorded samples. There is a lot you can do before you enter into the realm of recording sessions that are true logistical nightmares, or libraries so complex they require heavy scripting to get all those samples to play nice with each other.
It’s up to you how to approach sample recording, and it will largely depend on your use case for those samples. You can keep it as simple or as “complete” as you want.
For instance, if you’re going to just be reinforcing your snare sound, you probably only need to perform a couple of clean full strokes or rim shots (depending on your playing style) and let the mixing engineer, the producer, or yourself pick the best one out of those.
But if you want to comprehensively sample the snare (let’s call it “deep-sampling” for now, just for fun) you’d probably be looking at:
In other words, you and/or the engineer would have to:
And then potentially repeating the process, playing with Hot Rods, brushes, a heavily dampened snare, a wide-open snare, and literally any combination of techniques for the drum you are playing.
It may be a bit boring and labor-intensive to record all those audio files, but once you get in the swing of it, sometimes you just let the tape roll at the end of a take early in the session, and record the samples right there and then while the heads are fresh and the kit is in tune.
If you have a TuneBot or an iPhone with iDrumTunePro app or even a drum dial, this is a great place for these tools. I use them extensively to make sure the kit has the same tuning from take to take – especially on recordings across multiple days.
In the next section, I’m going to cover two ways to record samples:
Before we move onto microphones in this section, there are a few considerations that will heavily affect the sound of your samples:

When I record drum samples, this is usually the way it happens.
You already have a tuned-up kit in a room, and the microphones are in place. The engineer has done the line checks and set levels (possibly even some processing on the way “To-Tape”) and everyone is happy with the drum sound.
The drummer’s job is to simply hit each drum (and possibly the cymbals) one at a time while the engineer lets the computer or tape-record through every microphone on the kit.
If I’m drumming, I usually default to three hits of the same intensity, at three intensities, per drum. That means I’d hit the kick three times full blast heel up, hit the kick three times at a normal playing level heel up, and hit the kick three times softly, heel down. Rinse and repeat on snares and toms.
I’ll expand on this further in an upcoming section.
After the recording is done, there’s usually a bit of editing/cleaning up of the audio files to do, and a bit of mixing. The engineer will decide which microphones to use: for instance, it’s not uncommon to use snare top(s), snare bottom, overheads, and room mics when creating a snare sample. For a kick, it is not uncommon to use a combination of microphones around the bass drum, plus room mics.
On a few occasions, I’ve also used the floor tom microphones in a kick sample. If the floor toms are resonating sympathetically, they can add to the decay of the kick drum, making it longer and richer in terms of overtones.
If someone decides later to reprogram some drums on the album, having files from all of the microphones available to us means we can create a full-fledged library. The engineer can even dial in the “spill” between all the microphones – just like what would happen with a real drum kit – making it more realistic.
The reason why most of the sample sessions I am part of are done “in-place” is that this is usually enough for augmenting, reinforcement, and even some light replacement duties. By using the same setup that you use during the tracking sessions, it saves time and generates samples that are identical to the ones being recorded – making it more natural to add them to the mix later on.

Sometimes, I just need a sample. Something very particular.
I have a sound in my head and I simply can’t find what I want on my hard drives. Or I’ve come across a snare that just sounds amazing in a particular room and I happen to have the time to sample it properly.
In a mixing session I had not long ago, the drummer was playing on top of an 808 programmed beat. He had a mid/high tuned snare, with a nice lively tail and overtones.
Unfortunately, this snare was completely buried when placed in the mix against the 808 drums, layers of instrumental loop samples, and overdubs upon overdubs of backing vocals.
So I did what any good mixing engineer and drummer would do: I got up from the chair, went to my drum cupboard, and picked up my Mapex Black Panther Sledgehammer. I tuned it so it was deep and beefy, short in sustain, and just cracking like that thing can, and brought it to the studio.
Now, I just wanted a really nice snare sound. There’s no need for me to go set up a whole drum kit and mic it all up, is there?
I grabbed one of my large diaphragm microphones: a C12 style microphone with a CK12 style capsule – nice, bright, and snappy. I wasn’t recording anything else so I could actually place the microphone farther away from the snare to let the low end develop and capture the snare more as a whole (not just the top head, but how the head and shell resonate). I also left a dynamic mic by the rim to capture that “stick hitting the head” sound for extra smack, and placed an extra microphone underneath.
Voila! Big, fat snare drum. Pun intended as I may have actually used the Big Fat Snare Drum donut, so here’s a shout out to them – love your products, folks!
I’ve done quite a few snare samples like this. There’s no spill to worry about (eg. that pesky hi-hat bleeding into every microphone), and you can literally explore the space around the drum. You’d be surprised what a microphone a foot and a half away from a kick drum does to your low end: usually impractical to do with a full drum kit, but totally possible when focusing on a shell to sample.
After you capture your drum, mix down those microphones into one mono file (or stereo, if you wish) and do some editing – these things are required to prepare the file to be triggered by a sampler.
If you’re new to recording in general, pause this article and go read the beginner’s guide to recording drums for basic microphone placement. Otherwise, read on.
If you are doing an “in-place” sample recording, then you don’t have to change your original microphone placement. The samples should fit the drum kit sound you’re capturing. Therefore, it is a good idea to record everything as you are recording for the album, and mix it as you would the album. Then print a few samples you like down to mono (or stereo, depending on your use case) files.
It’s not as crucial to mic up a drum kit for samples as it is when you are recording tracks. For one, there’s no spill to take into consideration. You can even use condenser microphones (where you would probably avoid using them when tracking a whole kit).
But if your goal is to take samples out of a drum that you absolutely love and just need to add to your library, then it becomes a balance between getting creative and getting the best possible sound out of the drum that you can.
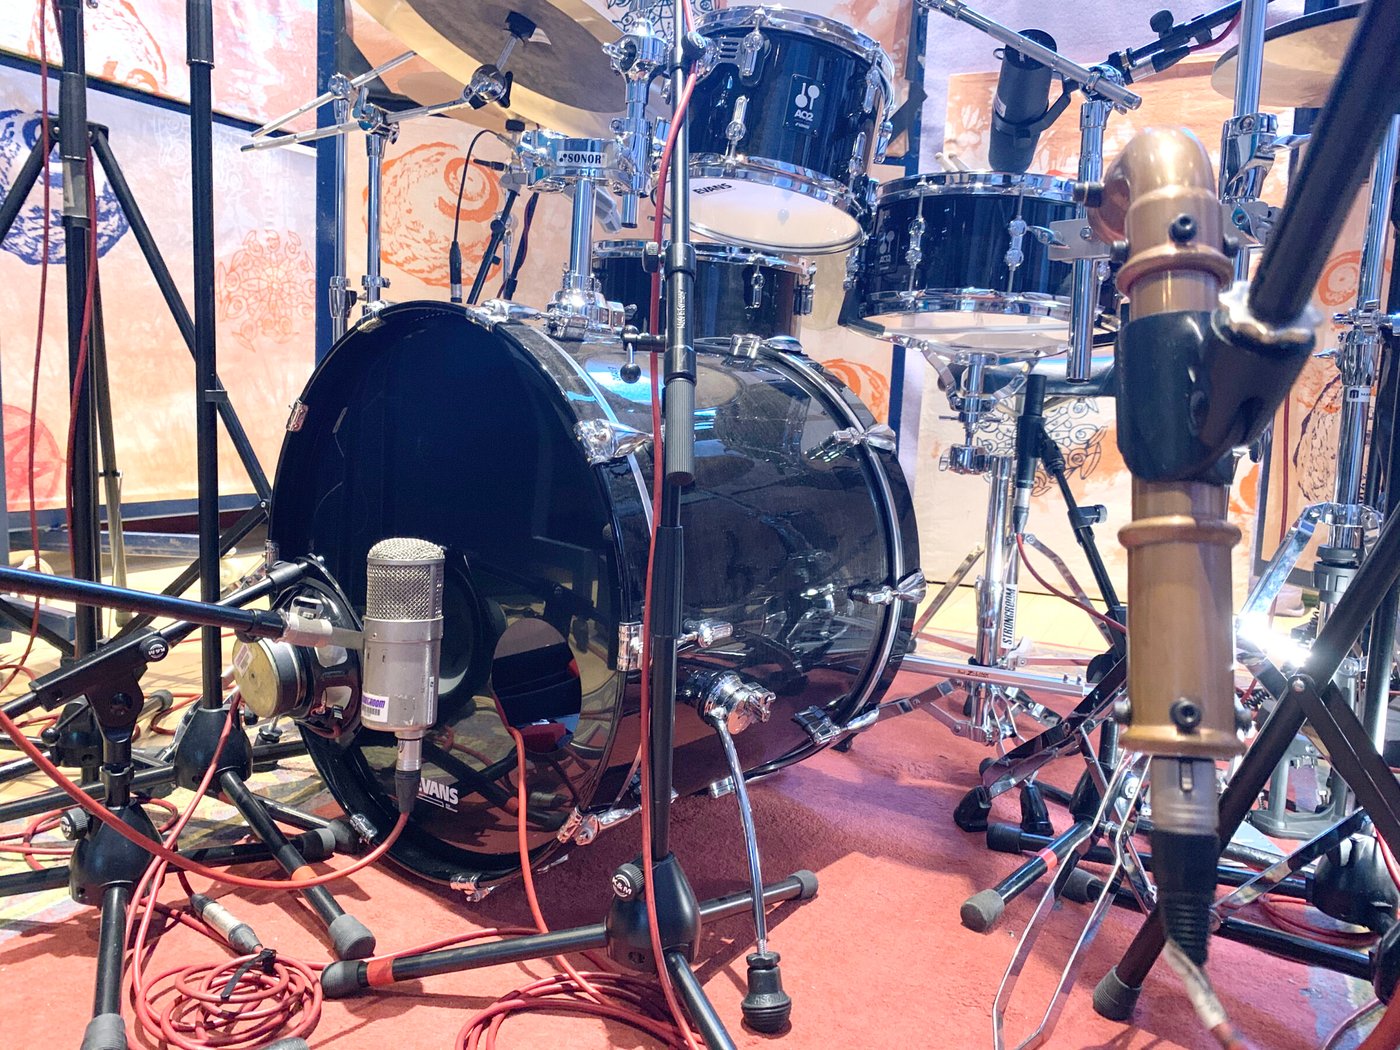
Before I move on to kick and snare examples, I’d like to give some general considerations and tips on the use of microphones:
For example, I love Earthworks microphones – you’ve seen and heard them as they are used in Drumeo’s videos. But in many cases, I’ll use a dynamic microphone for toms, such as a Sennheiser e604, MD421, Audix i5, or Audix D6. Sometimes, even large-diaphragm condensers like a Josephsons e22 or a Shure KSM32 might work best for the sound I have in mind. They will almost work like a compressor or a saturation unit and can dull down the sound of some drum kits – which can be a good thing if your room is too bright, or you are using very thin heads.
Click here (or scroll down) to learn how to make single-mic samples sound great.

Here are some of the combinations of microphones I like to use when taking a pure snare sample:
When you sit in front of the DAW, don’t forget to check the polarity between every microphone (mainly that “snare bottom” microphone pointing at the snares), and check each mic for phase by hand. This can be done by dragging the recorded files so they match, or by using plugins such as Little Labs IBP, Waves inPhase, or SoundRadix AutoAlign.

Otherwise, the snare might sound thinner when you add more microphones to it.
Don’t worry about making sure that all waveforms align. Use your ears. The relationship between all of those microphones is more complex than just aligning the waves – it’s a compromise. Sometimes the best result will be when you dial in “some” delay compensation, rather than making it exactly the same. Remember – you’re placing some of these microphones further away for a reason. If you were to just move back the room mics you’d defeat some of the purposes of getting dimension out of the drum.
Go crazy. That’s it.
No, really, go crazy!

A few years ago, an engineer friend of mine was running a recording where he had three kick drums, removed the hoops, and used them as an extension. The office and the other studios were complaining about the noise and the extended low end.
People usually limit themselves to kick in and kick out. Maybe a sub kick and a batter side microphone. If the genre allows (or there are enough inputs), people might consider putting a condenser or ribbon about three feet or so away from the kick drum in front of it.
Whether or not you decide to create a “tunnel” between the kick drum and the condenser (that is further away from the resonant head) is up to you. In a recording session, that’s a necessity. Unless you’re taking kick samples in isolation, you need to use gobos (freestanding acoustic panels), heavy blankets, and other acoustic absorption material between the kick drum and that “kick far” mic to minimize spill from cymbals and other musicians in the room.
Keep these points in mind, even if you’re recording your kick drum samples in isolation:
The closer your mics are to the floor, the more low end you’ll get. The higher you go in the room, the more attack and “air” you get out of the captured sound.
When I’m doing a kick sample capture, I usually do all of the above, plus a combination of room mics like the ones covered in the snare microphone techniques section.
Oh, and if you’re in a pro studio, make use of those cool compressors they might have stashed around. Or distortion boxes. This is the time to experiment. Remember, you have plenty of free tracks to record into as you are only recording one drum – you can always discard that later.

If you don’t know how to set up a session in a DAW to record your drums, stop right now and go read the beginner’s guide to recording drums.
So, you just sat down at your freshly tuned kit after hours of soundcheck.
You feel ready to nail that track in one take and the engineer asks you through the headphones, “Hey, mind if we record some hits for samples?”
You say, “Sure!” But in your head, you’re like “I don’t know what I’m doing; I guess I just hit the things,” and you proceed to bang everything once.
Or maybe you have that sinking here we go again feeling. “More boring stuff? I just want to play already!”
Trust me, this is easy and quick. It doesn’t have to take too long.
Unless the engineer is specifically asking you for specific hits, here’s what you do.
That’s it! Space those hits, and always count to five.

It gets a bit more involved if you’re in a session where you’re meant to “deep-sample” a whole kit. Usually, you’ll have a session producer guiding you through all the steps, as there will be many variations to go through. Someone is probably maintaining a spreadsheet of naming conventions, the number of each take, and what articulation and drum kit piece each take belongs to.
You can easily end up with over 100 takes, and once you add in all the articulation, the number could be closer to 1000 takes. These takes will then need to be split into individual files.
In such sessions, you can expect the producer to guide you on what they’d like you to do next, hit by hit. But the recording process is the same:
Note: You might have to count for longer than 5 seconds if the room is really lively (with long reverb tails). The reason I suggest you do 4 hits per drum shell, per velocity, per articulation, is that if you’re making a sampling library in Kontakt, keeping it to 4 samples works really well organizationally.
Remember to wait at least 5 seconds between each hit. The actual time you should wait depends on the tuning of your drums and the room you’re in. The more reverberant (“echo-y”) the room, the longer you should wait between hits).
The army of microphones around you is going to be surgically capturing the kit and the room. Don’t just move on to the next hit because “you stopped hearing it”, as some microphones will be picking up decay and tails for longer than you will – especially if you’ve been using headphones or IEMs, as you are likely to be experiencing TTS (Temporary Threshold Shift of hearing). Some of these samples may be processed or compressed.

Now that we have all the hits recorded, we need to edit these so we can create samples. Having organized files will make life much easier. We’re going to potentially end up with many files, and if they aren’t labeled correctly, you’re going to spend a lot of time trying to figure out which files do what.
The first thing to understand is the use of zero-crossing points, and transients, to avoid distortion, flammed hits, or phase issues.
The sampler will start playing the audio file as soon as it hears a transient come through. To prevent our sample from flamming with the original sound, we need to make sure the sample file starts as close as possible to the transient of our sample. The more space we leave in the file before the transient, the worse the flam will be (or the sample will just be playing late in the song).
Make sure that your audio file starts at the last zero-crossing point right before the transient starts. Otherwise, you’ll get nasty distortion, clicks, and pops.
Sometimes there isn’t a clean zero-crossing point, and this is where the use of fades can help. A fade-in can be used to avoid distortion/clicks pops at the beginning of the file. With a longer fade-in or softer curve, you can make the attack of the drum softer – which may or may not be desirable, but I encourage you to experiment with it.
Similarly, after the transient plays out, we need to naturally shorten the decay and ensure it completely dies out before the file ends. Otherwise, we might have clicks/pops or a very unnatural decay to the drum. Remember, we recorded almost five seconds of decay/room tone. For faster songs, this is simply too long.
Consider the following for your fades:

Now we’re ready to bounce these files!
Select only the microphones/tracks that you feel contribute to the sound of the drum you are sampling, and use your DAW markers to ensure they’re exactly the same length as the file.

Select Bounce to Disk or Audio Mixdown or Audio Export (depending on your DAW). This will “Bounce” or “Print” the mix of the selected tracks into a file of the exact same length as your selection.
Having a naming convention is important here. In my opinion, the most important things to include in all of your file names are:
Examples:
‘SonorBennyGreb_HiTuning.wav’
‘SonorBennyGreb_HiTuning_100-127.wav’
‘RogersKit_C1_100-127.wav’
‘RogersKit_D1_100-127.wav’
‘RogersKit_F1_100-127.wav’
‘RogersKit_SnTp_D1_100-127.wav’
‘RogersKit_SnBt_D1_100-127.wav’
‘RogersKit_OhAB_D1_100-127.wav’
‘RogersKit_Room_D1_100-127.wav’
You can see that RogersKit denotes the drum kit the sample is taken from. The SnTp, OhAB, and Room monikers refer to the microphone that is playing in that file, while the D1 refers to the instrument. In these examples, the file ‘RogersKit_SnTp_D1_100-127.wav’ contains a snare sample (D1 in General MIDI standard) that has been captured by the snare top microphone. The file ‘RogersKit_OhAB_D1_100-127.wav’ contains a snare sample (again, the D1 tells you this) but this time captured by the overhead microphone pair in an AB configuration.
If you followed the above guidelines, your sample will be easily and effortlessly mapped within Kontakt!
You can see an example of this process in the ‘creating a one-shot sample’ description here.
Alright, so we have our samples recorded and edited.
We are now mixing a track and we want to start reaping the benefits of the drum sample collection we’ve been curating for replacement, enforcement, or augmentation duties.
By now, maybe you’ve been recording samples of every nice kick, snare, and tom you come across. And not just collecting these samples, but spending some time organizing and documenting your library.
If you haven’t, then the process of choosing a sample can take as long as the rest of the mix itself (there are some very large libraries out there).
If you’re working with a DAW (which you should), sample replacement is easy. There are a few ways to approach it:
If you are working on a hard drive recorder (such as Zoom R16, or Alesis HD24 or RADAR), and you want to do sample replacement, you would need to follow some of the techniques used back in the tape machine days: copy the track you want to replace, gate it, compress it, and then shift the track back a few milliseconds to account for the delay in retriggering it, before feeding it to your sound replacement machine of choice. It’s still simpler than using tape, but the principle is the same.
Here’s a detailed explanation of each of these three sample replacement techniques in your DAW.
These plugins make life so easy. You place the plugins as an insert in the channel you want to replace, and the plugin listens to incoming audio to trigger a selected sample.
Regardless of the plugin you choose, you’ll find:
This is especially true during rolls. Drummers can get excited when starting a roll and the dynamics will shoot up drastically, making the spill go above the threshold temporarily.
Nice-to-haves on a trigger plugin include:
If you don’t have any of the plugins mentioned above (they aren’t free), there’s a technique you can use to achieve the same result, but it comes with some limitations. It’s a bit time-consuming, but you’ll get faster the more you do it.
This is also really useful if the original track has way too much noise for the trigger plugin to accurately detect when to trigger the sample.
Note: I’m going to be using Pro Tools shortcuts/hotkeys for this example.
Now, after doing a couple of hits, you might think no one has time for that! The good news is you can get lightning fast at this.
Place your left hand over the ‘TAB’ and the ‘V’ button, place your right hand over the ‘P’ and the ‘;’ button, and let those fingers do the work.
TAB ; V P TAB ; V P TAB ; V P TAB ; V …
I can probably do about 3-4 hits a second. You’ll be able to do this just as fast with some practice.


This basically stems from the above method (tab-to-transient and paste) to create a phase-accurate track with replacement samples, and uses the same technique. But instead of pasting an audio sample, we’re going to be pasting a MIDI note into a MIDI track.
MIDI can be used to trigger a variety of digital and hardware samples. Once you’re done, you can use this track to trigger Kontakt, Superior Drummer, Battery, or even hardware drum machines like an 808 or 909, synthesizers, and samplers.
Note: I’m going to be using Pro Tools shortcuts/hotkeys for this example.
How do you know which MIDI note to use?
You need to know what the destination MIDI note is for this to work correctly.
Unfortunately, some manufacturers decided to ignore standard industry conventions, so there isn’t one answer to what note is correct, but as a rule of thumb you’ll find:
Bass Drum – C1 (Note 36)
Snare Drum – D1
Low Tom A – F1
Mid Tom A – A1
High Tom A – D2
For more information, consult the General MIDI Drum List.
Oh, and to make things even more interesting, different manufacturers decided to have a different idea as to what the note C4 really is. That means that on some keyboards, the Bass Drum might actually be C2 (note 36).

Now that you have your own samples, if you want those sounds live, you can also upload the samples into a module and combine it with a trigger!
Not everyone has access to a pro studio, or the budget to set up a bunch of mics to capture all the sounds you want out of a drum. The good news is you can still create samples that are larger than life and full of energy! You just need to get creative with the processing chains you use. In this video, you’ll learn how to do this with equalizers, compression, non-linear reverb, and saturation. You’ll also learn how to add more low end to a snare sample and how to create ‘fake snare wires’.
I hope this article helped you embrace drum replacement, augmentation, and enforcement as both a tool to get your recordings to the best possible place, or to explore your creative side and bring fresh sonic possibilities to your tracks without having to spend time and money buying different kits or modifying them.
Looking back, drum samples have been a fundamental part of western music going as far back as 50 years, across a variety of genres. It’s true that the more commercially successful a mix has to be, and the more ‘busy’ the drums are expected to be in that genre, the higher the likelihood that samples are added to (or completely replacing) the original acoustic drum sounds.
Seeing how easy it is to use plugins to immediately get a huge collection of samples under your fingertips, maybe I’ve also inspired you to start your own sample library. Start simple by sampling your favorite tuning on snares and drum kits you already own, then explore more in-depth sampling techniques where you modify your kit or experiment with muffling and different heads, even throwing in percussion accessories.
At the end of the day, what matters is that you have the song sounding as good as you can, or as good as you’ve imagined it in your head – whatever your budget and situation may be.
As an engineer, I consider it essential that we curate a library of samples that we can use for the productions we work in. Not just collect them blindly, but learn them! Every time you add a sample or buy a library, spend some time trying them all out in context. It’s the only way you’ll get to know what sounds you have at your disposal and in what context they fit nicely.
I’d also like to thank Jake Murray at Strongroom Studios London for making the session possible, Jessi Camileri for her incredible ears behind the console and being such a huge help setting up three drum kits in a single day, and Chrissy for her incredible drumming chops and performance on all the drum sample recordings.
Free samples? Of course! If you want to hear the samples I recorded for this article – or grab them and use them for your own projects – here’s a zip folder full of snare and kick files. We used a Sonor AQ2 bass drum and a 1960 Rogers Powertone bass drum, and Ludwig Supraphonic 400, Noble and Cooley Tulip, and Sonor AQ2 snare drums. Enjoy!
[Click here to download the folder]

Articulation – A term that comes from more classically trained musicians. It is a parameter that describes how every single note or sound should sound. There are a number of words that can be used to describe how long or short a note should be, how soft or sharp the attack should be, or even if the pitch and timbre should be modified. It’s common with other instruments and probably less common in drums, but still applies to us. Common articulations are legato, staccato, marcato, tenuto, for strings we have others such as pizzicato, brass, and woodwinds have syllables to be used for “tonguing” and we as drummers have full strokes, ghost notes, rim shots, side sticks, etc.
DAW – Digital Audio Workstation. Computer software that is designed to handle multiple audio streams. It usually supports recording and playback of multiple sources at the same time, as well as offering extensive tools for editing and mixing.
Gobo – A term used to describe a movable acoustic panel. These panels are typically designed to absorb sound – minimizing reflections from the room’s walls or ceiling – but can also be used by engineers to maximize the isolation between two musicians. More complex models of gobos even include small windows so everyone can see each other, and some include a diffusive side instead of absorption.
In-The-Box (ITB) – A term used to describe a mix where the entire processing has been done inside a DAW without the use of a mixer or external outboard. This was hard to do – but not impossible – in the early ’00s but has become very common during the last decade. The alternatives to ITB mixing are OTB – or “Out-of-the-box” where the DAW plays the role of the tape machine, and the album is mixed on a mixing console and outboard – and Hybrid, where some of the mix happens in the box, but other parts are delegated to external outboard, summing mixers, etc.
Mixing – One of the latest stages in music production where the multiple sources of sound are mixed into a single stereo file. This is done by applying different processing to individual sounds and to the mix as a whole while balancing the relative loudness between all these different sources. People usually associate mixing with the picture represented by a large board full of knobs and faders, but mixes can also be done 100% inside digital systems/DAWs. Modern mixes can have as many as 200 sound sources, with drums taking up a huge chunk. A modern complex metal recording can use over 20 different microphones (and sound sources) that later on have to be mixed down to stereo.
Phase – When two nearly identical signals combine, any timing difference between the two signals can have deep, adverse effects on the resulting (combined) sound. The effect can drastically change the frequency response of the original signals, canceling or boosting one or more frequencies on the original signal. When talking about phase issues between two or more microphones, the lower frequencies are usually the most problematic due to the distance between microphones usually corresponding to the wavelength of lower frequencies.
Proximity Effect – With some microphones, the closer you move the microphone toward the sound source, the more low end (bass) you will get. This can be problematic, or a tool for sound shaping. When recording snare drums, your snare might be too boomy and it will clash with the bass guitar, kick drum, or even vocals. On the other hand, if the toms are thin and high pitched, but you want a bit of a thunderous tom sound, getting the microphone in close can give you a little bit of that boom that you may lack at first listen.
Spot Mics/Spot Microphones – Microphones that are placed very close to the rim of a drum shell, near the point of impact. The sole purpose of these microphones is to capture the drum shell (or cymbal) more accurately with minimal sound coming from the rest of the room.
“To-Tape” – A term that comes from the tape machine era of studio recording. When someone says they’re “processing the snare drum to-tape” it means the engineer is applying some audio processing like EQ or compression before the signal is recorded. Professional studios often have complex signal routing capabilities that let engineers process signals as if they were already mixed to showcase what they can sound like when mixed, but the engineer will record the signal clean (un-processed) for more flexibility in the mixing stage. This is often called applying processing “Off-Tape”.
Transient – A high amplitude and short duration sound. In music, typically sounds start with a transient and then decay or sustain (like a hammer hitting a piano string). A drum’s waveform is almost exclusively comprised of a transient pulse that dies off really quickly.
Velocity – Velocity is a MIDI term. It’s one of the most vital things transmitted in a MIDI package as it represents how loud you are playing a given note. How much force did you apply to that key? How fast was that mallet or drumstick hit? Due to mathematical constraints, velocity is represented by a number from 00 to 127. 127 being the loudest rimshot you can play, 00 being complete silence, and a medium loud snare sitting around a velocity of 80-90.
Zero-Crossing Point – In a DAW, you’ll see your audio represented by a squiggly line going above and below a horizontal line. This line is “analog” to the movement the speaker will have to perform to turn audio (voltage) into acoustic sound. To make an edit at the “zero crossing point” means we’d cut the audio at the point where the speaker would be in total rest – not moving inwards or outwards. This ensures our sample can be played cleanly and without added distortion. In a DAW, this looks like the point where the audio line intersects the horizontal reference line.
*This article contains affiliate links, which means we might earn a small commission from the product seller if you make a purchase. For more info, check out our privacy page.
João Lebre is a freelance mixing engineer at caffeinatedaudio.co.uk and drummer based out of London, UK. He has toured as drummer and FOH engineer, designed and commissioned world class studio installations, and lectured a range of audio engineering topics for SAE London. João is a passionate music instructor and is truly obsessed with gear.
By signing up you’ll also receive our ongoing free lessons and special offers. Don’t worry, we value your privacy and you can unsubscribe at any time.
/marketing/drumeo/promos/july/Primary.svg)